
About Me

- Mica
- Vashon Island, Washington, United States
- Please check out my Etsy shop at www.etsy.com/people/EmeraldApotcalypse. I will be posting what I'm working on, tutorials I have used and ones I have created. Also expect to see the finished products and how to get them. Thanks for stopping by.
Wednesday, October 26, 2011
Monday, October 24, 2011

Woven Top Tutorial
Feeling weird since I have not actually sat down to make something in a couple of weeks, been busy trying to get my parents house into ok shape before me and E move out in January. Still want to keep gathering ideas to keep me thinking. As i go through the piles and piles of materials I have...hoarded for a couple years there are so many great patterns of fabrics I have that are too small to do much with. I think if I found a solid color top like the one they used and mix the crazy pattern strips I have it would look noice brah.
Blah blah blah here is the tutorial.
*find yourself an worn-in top.

*lay the top flat on your workspace. begin cutting from the base of the shirt to the top in 1 & 1/2 to 2 inch strips, leaving the waist band in tact. cut only to the shoulder seam and to the base of the neck. some of your strips with curve towards the shoulder seam. i worked from the side seam in, measuring towards the center in order to get semi-even strips. do not cut the side seam: that it where you’re going to attach your fabric.

*use a contrasting fabric of similar weight/stretch. i used a knit mesh in cream. you don’t need much: i used about a quarter of a yard. (you could even cut up another used/worn shirt if you’re looking to down-size your wardrobe: make 1 shirt from 2.)

*with right sides together, cut 1 & 1/2 inch strips. i cut 10 strips. depending on the size of the shirt and how tight you want it woven, you can add more or less. the fewer the strips and/or longer the strips, the more you can see through the weave.

*begin weaving the contrasting fabric strips through the top, altering every other row to create a basket weave effect. the easiest way to do this is to pin one end of the contrasting strip to the side seam of the top. weave the strip through and pin on the opposite side, cutting away any excess material.

*in order to keep strips even, pin along the shoulder seam, but keep your strips straight. (turning them will cause awkward bumps and bulges. you can turn the shirt inside out if you’re having trouble keeping things lined up and pinned.)

*once everything is pinned, sew along your side and shoulder seams. i used grey thread to match my top, so you can see where i’ve added stitches. turn your top inside out and cut off any excess material that may create bulk.
*you’re done:
note!: i wore my top once and a lot of the weave sort of collapsed down so you couldn’t see the details of it. my guess is that this happened because the knit fabric i used was very different in weight from the sweatshirt. to fix this, i hand stitched tiny X’s at various points across the weave in order to keep things in place. you could probably avoid having to hand-stitch anything if you use similar weight fabric and attach the woven material at the side seams a bit tighter than i originally did."
{Found this at Made By Rachel today}
Wednesday, October 12, 2011
Gathering: Washer Necklace Tutorial
Found this great tutorial that I would love to try out with a necklace or maybe even bracelets...
The following is a post from The Small Object blog originally hosted over on Blogger that has since been deleted. This post was originally published in May 2005.
“Last time I was in NYC I went to see the Josef + Anni Albers exhibit at the Cooper-Hewitt National Design Museum and it was awesome. But the item I remember being most excited about was Anni Albers’ necklace made with washers and grosgrain ribbon. This was one time I was desperately hoping the museum store would come through for me. Nope. This necklace was not available. So for months I’ve been trying to see how she weaved the washers together. The problem is my memory of it was very different than the actual construction. Alas, I finally found a picture online and see it was not nearly as complicated as I thought it was.
Thankfully, I finally figured it out.
First off, Anni Albers’ beautiful necklace:

(I also saw it with red ribbon which was is my favorite.)
Personally, I love it, so perhaps you want to make one, too. Here’s a quick tutorial.
- 35 to 50 3/8″ washers (10 washers makes 4.5″ of necklace)
- Grosgrain ribbon 1/2″ wide (3/4 yard or so)
Step one: Thread ribbon up from behind washer #1. You should leave about 6″ inches of ribbon on the end.

Step Two: Thread ribbon up along the side of washer #2 and back down through the middle. The end should be threaded back through the middle of washer #1. (Still with me…)

Step Three: Pull ribbon tight so washer #2 lies flat against washer #1.

Step Four: Thread ribbon back up through washer #2 so it weaves underneath washer #1.

Step Five: Repeat process. Thread ribbon up alongside edge and back down through the middle of washer #3.

Step Six: Thread end of ribbon back through the middle of washer #2.

Step Seven: Pull ribbon tight to the right so you have all three washers laying flat. Repeat above steps.

Then you’re done!!”

Thanks to: http://thesmallobject.com/stenopad/wordpress/?p=976
The following is a post from The Small Object blog originally hosted over on Blogger that has since been deleted. This post was originally published in May 2005.
“Last time I was in NYC I went to see the Josef + Anni Albers exhibit at the Cooper-Hewitt National Design Museum and it was awesome. But the item I remember being most excited about was Anni Albers’ necklace made with washers and grosgrain ribbon. This was one time I was desperately hoping the museum store would come through for me. Nope. This necklace was not available. So for months I’ve been trying to see how she weaved the washers together. The problem is my memory of it was very different than the actual construction. Alas, I finally found a picture online and see it was not nearly as complicated as I thought it was.
Thankfully, I finally figured it out.
First off, Anni Albers’ beautiful necklace:
(I also saw it with red ribbon which was is my favorite.)
Personally, I love it, so perhaps you want to make one, too. Here’s a quick tutorial.
- 35 to 50 3/8″ washers (10 washers makes 4.5″ of necklace)
- Grosgrain ribbon 1/2″ wide (3/4 yard or so)
Step one: Thread ribbon up from behind washer #1. You should leave about 6″ inches of ribbon on the end.
Step Two: Thread ribbon up along the side of washer #2 and back down through the middle. The end should be threaded back through the middle of washer #1. (Still with me…)
Step Three: Pull ribbon tight so washer #2 lies flat against washer #1.
Step Four: Thread ribbon back up through washer #2 so it weaves underneath washer #1.
Step Five: Repeat process. Thread ribbon up alongside edge and back down through the middle of washer #3.
Step Six: Thread end of ribbon back through the middle of washer #2.
Step Seven: Pull ribbon tight to the right so you have all three washers laying flat. Repeat above steps.
Then you’re done!!”
Thanks to: http://thesmallobject.com/stenopad/wordpress/?p=976
Tuesday, October 11, 2011
Now available at Good Merchandise on Vashon Island!

Here is a cute picture of the shop:

http://good-merchandise.blogspot.com/
Sunday, October 9, 2011
gathering ideas for the winter
Trying to find some low cost projects to work on since everything has been over $25. The goal is to get some $10 and under pieces into Good Merchandise & up on Etsy.
Here is what I've found so far:

Here is what I've found so far:
This is a super simple project.
All you need is a hair comb and embroidery floss.
I had a pack of hair combs that I got at Walgreens a long time ago
(Like 10 or 12 combs for $4- they still have them).
Vintage embroidery floss from forever ago.

This project is from http://lemonjitters.blogspot.com/
Wednesday, August 24, 2011
If any one is out there
you are the lucky of lucky to know that Etsy is super cool and allows you to make promotional codes.
BUDLUST gets you free shipping!
Stop on by!
BUDLUST gets you free shipping!
Stop on by!
Monday, August 22, 2011
Sunday, August 21, 2011

Friday, August 19, 2011
This/That
I was poking around Etsy when I saw this really beautiful 70's Maxi dress. (here)
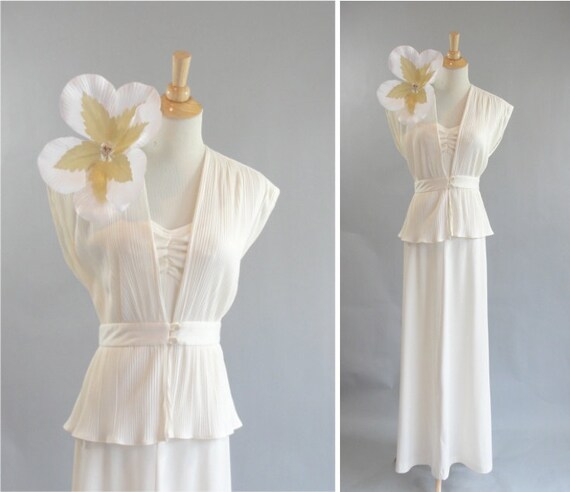
But all I could think about was that dress Carrie Bradshaw wears at some point during Sex and the City movie. Thank god for google because 'sex and the city Carrie Bradshaw big flower' gave me the exact picture i was looking for.

Thursday, August 18, 2011
3 Sandstone & Beachwood rings
Peach Sandstone Ring

Even though this ring stretches across your knuckles it is a one finger ring. The peach sandstone that sits on top is pointed on one side and curved on the other. It is resting on top of a piece of sanded down beach wood. The whole ring is fitted on a refurbished skateboard bearing.
This ring is made for 100% found materials!
Fits a ring size 8


Rainbow Mountain Ring

The best part of this ring is the pretty piece of sandstone that has layers of white, grey and peach. It sits on a piece of wood that has been colored with colored pencil and sanded down to be nice n' smooth. The 'rainbow mountain' sits on a refurbished skateboard bearing.
Ring size 8


And The Sticks & Stones Ring


This is the smallest of the 3 rings set. It is a dainty ring, that still is pretty bold.
I sanded down the stone everywhere except one corner that has more jagged crystals.
Ring size 8
If you have any other questions feel free to contact me.

All $25 bucks, get 'em here!
How I made them:
-Find a piece of stone or rock that you really dig. Finding one with a flat side is helpful but you can also sand down one side to be flat if you need to.
-Find a piece of wood, maybe beach wood. Cut and sand it down to around the size of your stone.
-Find the base for your ring. I used a skate bearing, perfect size. You can also use copper tubes and cut them to the size you desire.
-Super glue the stone onto the beach wood first. I placed a weight on my stone and left it for an hour just to make sure.
-Next glue the wood to your circle ring material. Make sure you keep it center and hold force on your glue job for a LONG TIME. Just to be safe.
-Celebrate, you got some sweet rings.
Tribal Flowers Felt Necklace

This is a very colorful necklace that is for a bold person :)
$15
Get it here.


I find that supplies that get left over from one project usually inspire another one for me, sadly I throw so little away. My room is a tower of supplies and scraps that thankfully are getting used but its hoarders worthy at times.
How I made this necklace:

- I found the leftover fabric belt piece from my shorts project and trimmed it down to a necklace length.
- Put that aside. Next you want to cut out 2 pieces of felt in the shape you desire. I chose a subtle half circle but triangles and circles would be cool choices too. Put the two felt pieces aside.
- Get the fabric you want to make your flowers out of. Cut out circles of fabric in diffrent sizes. Fold the circle 3 or 4 times in half and sew the flower together. There are UNLIMITED ways to sew the little flowers. Go nuts.
- Sew your flowers onto one piece of the felt.
- Add beads to the middle of the flower buds. (You can let your thread job be a little messy on the back side of the felt since you won 't be able to see it in the end)
- Place the two ends of the fabric belt on each side of your shape and pin.
- Hand or machine stitch (depending on your comfort level and your beading) around your shape.
- FUCK YEAH! YOU DID IT!
Deep Blue Striped and Pleated Tank Top Vest by The Emerald Apotcalypse

Size M
$12
One of my earlier projects, this vest came out pretty good. It began as a short sleeve blouse that was very middle aged lady like. I started by cutting off the sleeves and doing a hem stitch around the arm. I wanted the shoulders to have a thinner strap so I folded the fabric over into pleats and did a straight stitch through each layer. This is a very simple project, but the fabric really caught my eye and I think it has a mexican tribal vibe to it.
Check it out here.
Inspiration// Erin Considine
Since I got my facebook group for The Emerald Apotcalypse I've been recommended to check out the designer Erin Considine. Her work is really really amazing and kind of the same vibe I got going on.


She has a offcial website, and a tumblr if you are interested.


She has a offcial website, and a tumblr if you are interested.
& more shorts!

Sneak preview! These shorts are not even listed on etsy yet!
This is really really easy to do and can really change a pair of pants or shorts. I just found a fabric belt at a thrift store that had this pattern on it. After turning these jeans into shorts I pined on the strip of belt and cut it at the length of the outer seam. After you have the strips where you want them just sew them down!

Shorts!

Denim shorts with mustard & black lace pockets by The Emerald Apotcalypse
These denim shorts are made from up-cycled jeans. The pockets peek out of the cuffed bottom. Both front pockets have mustard felt sewn in with black lace overlaying the felt.
Size: 33 W
These short are so easy to make. Just find fabric that you like and match the shorts or pants you are using. Try looking for sheer fabric like lace to overlay and make it more interesting. Take a piece of paper and do a loose trace of the size of the opening above the pocket. Cut out the pattern from your fabric and sew into the shorts.

my etsy.
Tuesday, August 9, 2011
My notes from, "Tips for increasing views on Etsy"
“The more items in your shop, the more items that you have to be found on Etsy — that’s my little theory!”
"Tag colors in the languages of the countries I sell to, as well as list the type of item (necklace, earrings, etc.) in the languages of the countries I sell to.”
"Set your location. In your profile, make sure your location is set to City, State, Country. That way buyers who are using Geolocator or Shop Local are going to be able to find you. “I’ve gotten art shows and several invitations to craft fairs just by listing my location. People (myself included) love searching for local talent!”
Ahem, this one I am working on...
"Be seen off Etsy. The more content you create on the web, the more people are going to bump into you. If the content is interesting (or funny, smart, weird) people will want to know more about you and will find your Etsy shop in the process. The best part? Creating this content is free!"
"Adding new items always gets my shop more views than renewals, so my tip is add more product.” I agree: listing new items on a regular basis is a much more effective approach."
Monday, August 8, 2011
Paypal is set up!
FUCK YEAH!
People of the internet, feel free to use plastic to buy my things.
Merchandising.
People of the internet, feel free to use plastic to buy my things.
Merchandising.
Saturday, August 6, 2011
Denim shorts with purple fringe

Size: W 33
$12

Get it here on my etsy!
Subscribe to:
Posts (Atom)